Uninstall Tracking
AdGyde's Uninstall Tracking functionality allows you to track the number of uninstalls for a specified application. Uninstalls is an important index which helps you to track the quality of users and hence the campaign.
1. Requirements
An Android application with AdGyde SDK integrated. Also, Firebase Project's Server Key for the same application
Notes:-
2. Steps to Enable AdGyde's Uninstall TrackingNotes:-
- Uninstalls tracking is supported from Android SDK version 3.1.0
- If you are using multiple InstanceIDListener services, you can create your own Listener and pass the token to AdGyde's API
2.1. Application Without Firebase Messaging
3. Obtaining the Firebase Server Key If your android application is not using Firebase Messaging Service, then follow below instructions:
2.2. Application with Firebase Messaging Integrated - Get your Firebase project's Server Key (Section 3)
- Enter the Server Key to your AdGyde's dashboard. (Section 4)
- Configure Firebase Messaging on your app. (Section 5)
- Add the following code to your application as described:
- Add the Firebase Dependency to your app's build.gradle file, as the following:
dependencies {
}// . . .implement 'com.google.firebase:firebase-messaging:19.0.1'// . . .
- Add these lines to your app's AndroidManifest.xml file, inside the application tag:
<application
</application><!-- ... --><service android:name="com.adgyde.android.FIIDService" exported="false" ><intent-filter>
</service><action android:name="com.google.firebase.MESSAGING_EVENT"/>
</intent-filter><!-- ... -->
If you have Firebase Notifications integrated into your app, then follow these instructions:
- Obtain your Firebase project's Server Key. (Section 3)
- Enter the Server Key to your AdGyde dashboard. (Section 4)
- Add the following code to your application as described:
- In your InstanceIDListener Service's onTokenRefresh method (a class extending com.google.firebase.iid.FirebaseInstanceIdService), call our API inside the overridden method onTokenRefresh, as in the following example:
public class FIIDService extends FirebaseMessagingService { private static final String TAG = "FIIDService";} |
- Open the Firebase Console: https://console.firebase.google.com
- Create a Firebase Android Application project (if you have not already done so). For more information, visit this link: https://firebase.google.com/docs/notifications/android/console-audience#add_firebase_to_your_app
- After the project is created, open the project page by selecting the project from all the listed projects
- Navigate to the Project Settings (click on the cogwheel next to Overview on the left pane of the page)
- Under the Cloud Messaging tab, you can see your Sender ID which you may be using for FCM / GCM) and two Server Keys as shown below
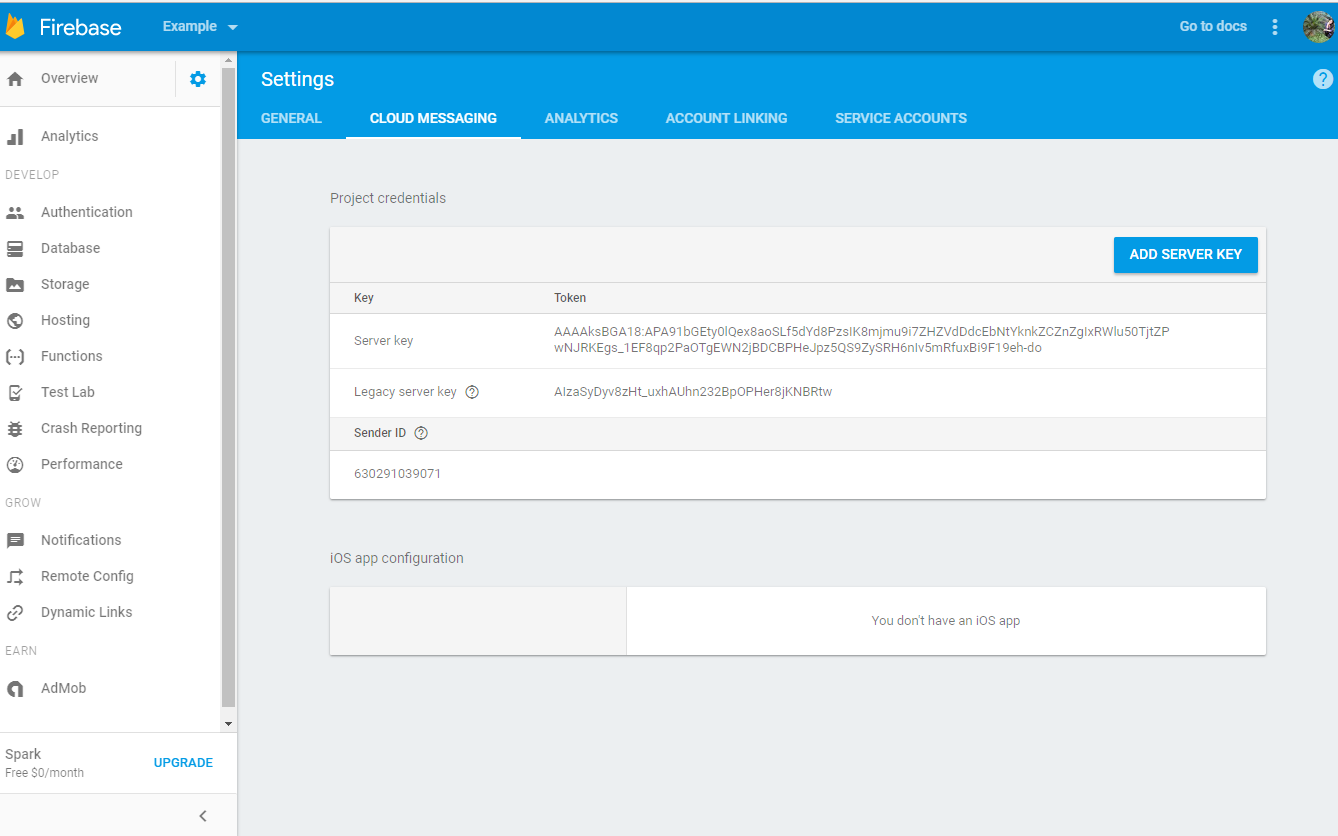
- Make Note of Server Key (The Long Key and not the Legacy Server Key), which will be input in AdGyde's dashboard for uninstall tracking
- Login to AdGyde Dashboard
- Click on Setup -> Uninstall left navigation menu.
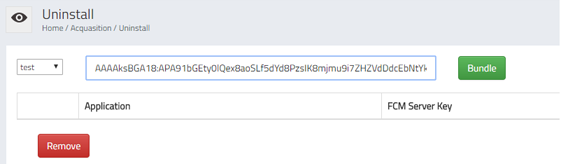
- Input the Firebase Server Key, which you had copied / noted in previous section in the area provided
Follow the below steps as listed, or alternatively visit the firebase integration link by Google
https://firebase.google.com/docs/cloud-messaging/android/client
https://firebase.google.com/docs/cloud-messaging/android/client
- Download your project's JSON file: google-services.json and saved it under your application's module directory. If you do not have this file, you can download it from your Project Settings in the Firebase Console
- Add the Firebase-Messaging dependencies to your project. Add rules to your root-level build.gradle file to include the google-services plugin:
buildscript {
}// ...dependencies {
}// ...classpath 'com.google.gms:google-services:4.3.0'// ADD THIS LINE HERE
- In module Gradle file (usually the app/build.gradle) of the project, add the apply plugin line at the bottom of the file to enable the Gradle plugin, and add also the dependency inside the dependencies block
apply plugin: 'com.android.app'
android {
}// ...
dependencies {
}// ...compile 'com.google.firebase:firebase-messaging:19.0.1'// ADD THIS LINE AT THE BOTTOM OF THIS BLOCK
.
.
.
apply plugin: 'com.google.gms.google-services'// ADD THIS LINE AT THE BOTTOM OF THIS FILE
In case "Could not find.." error is encountered, make sure you have the latest Google Repository in the Android SDK Manager to resolve the same
6. Using ProGaurd with Uninstall Tracking
If your project is using ProGaurd, you need to take care that AdGyde SDK functions and Google Firebase Messaging Service functions do not get obfuscated, for same following rule exceptions need to be added in ProGaurd file
7. Testing Android Uninstall Tracking | -dontwarncom.adgyde.android.** -keep public class com.google.firebase.iid.FirebaseInstanceId { public *; } |
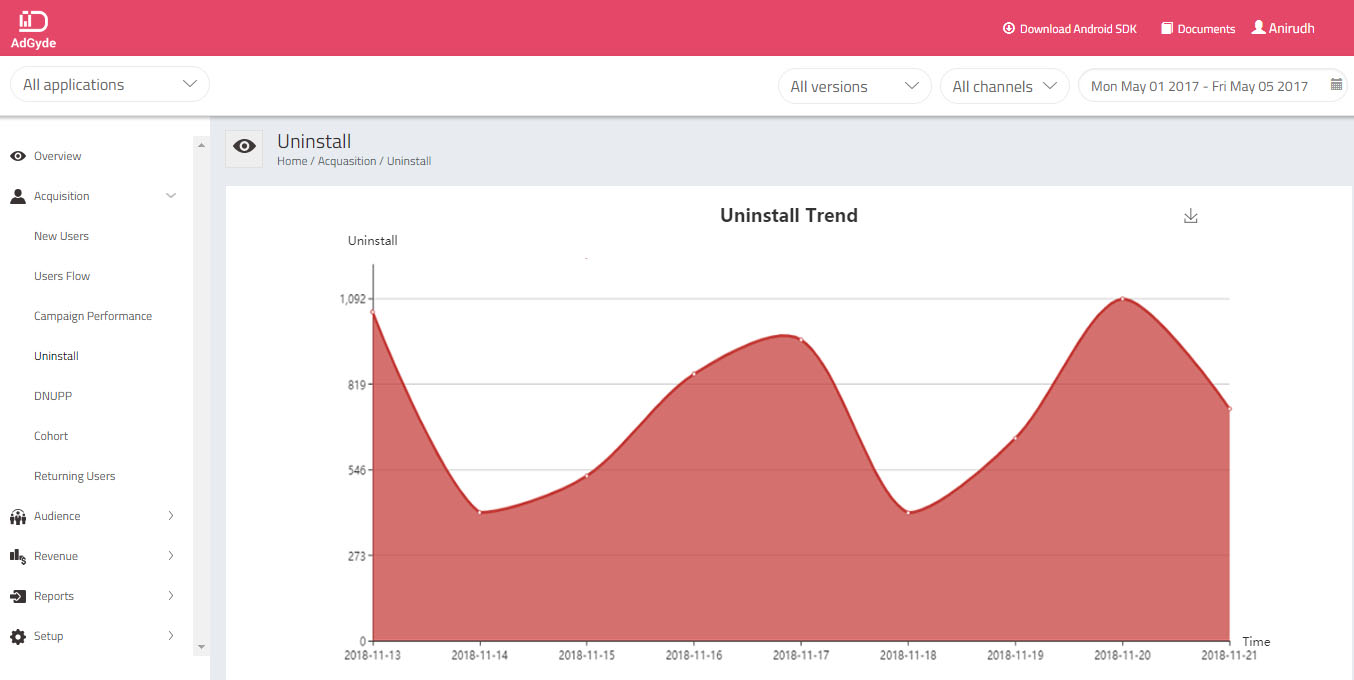
Testing of uninstall tracking is quite simple.
Whether the android application is live on Google Play or pending submission or even if out of store, the test will remain the same - just uninstall the app from the device.
It takes up to 24 hours for the new app’s uninstall event to be displayed on the uninstall trends section of the Dashboard.
Whether the android application is live on Google Play or pending submission or even if out of store, the test will remain the same - just uninstall the app from the device.
It takes up to 24 hours for the new app’s uninstall event to be displayed on the uninstall trends section of the Dashboard.